UV-Texture editing
Here are the steps to take in order to texture that ugly clown
- Open Modeler, load model ClownHead.lwo
- Add material by hitting the Surface (q) button at the bottom of the screen.
- Name the new surface "Face"
- make the initial color pink
- add a little specular (15%)
- check "smoothing".
- Open the Surface Editor (F5)
- Select the new material you just created ("Face")
- Click on the T to the right of the color setting (in the Basic tab). This will open up the Texture Editor for color on Face
- There should be one layer, of the Layer Type: Image Map
- Click on the Image: (none) and choose Load Image
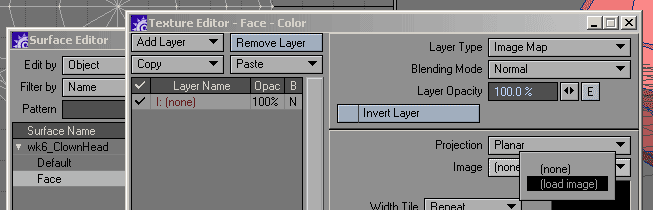
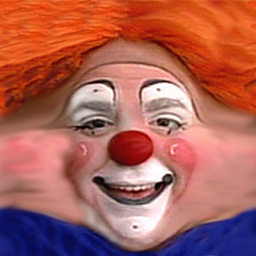
- Load the image ClownFace.jpg
- Close the texture editor by clicking on Use Texture
- Close the Surface Editor
We've applied the texture but got nothing to show for it!
- First this I tend to do is turn off the grid for the perspective view
- Open the Display Options (d)
- Go to the Viewports tab and select the viewport showing the perspective view (Top Right or TopR in this case)
- Check Independent Visibility and uncheck Show Grid
- Switch the perspective view to Texture mode to the see the texture on the object.
- The texture will appear quite blurry. You can improve this by openning up the Display Options (d) and, under the Layout tab, increasing the Texture resolution from 64 to 256 (the resolution of the image)
- First impovement is to open up the Texture Editor again and hit Automatic Sizing. This will iprove the size, but texture is still off, and will also still appear on the back of the object
- The next improvement is to switch the projection to Sperical and change the Texture Axis to Y
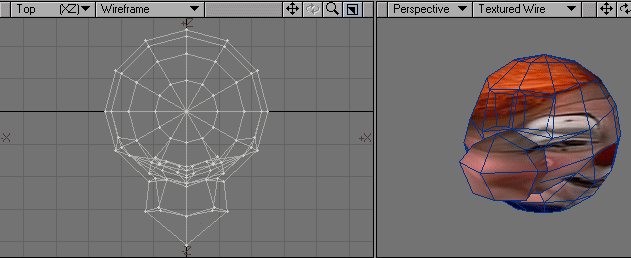
The etxure is totaly off. It is slapped on there using a planar projection (along the Z axis) that is too big.

Wouldn't it be great if this were now a perfect fit! The image on the left is created using a cylindrical projection along the Y axis, scaled to X = 500mm / Y = 600mm / Z = 500mm with the position set to 0, except for Y which is set to -50mm
This is as good as it gets using standard projection methods. We need to manually adjust the testure coordinates to create a perfect fit. This means we need to use UV-Texture Coordinates
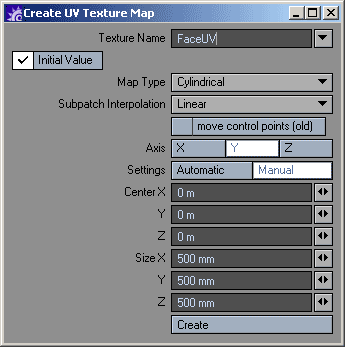
- Select the Map tab at the top of the modeler screen
- Choose Texture > New UV map
- In the Create UV Texture Map that pop up,.put in the values seen in the image to the right
Note that in LightWave the term "UV Texture Map" refers to a Vertex map in which UV texture coordinates are stored, and not to the image that will be projected onto the surface using these coordinates.
- Open up the Texture Editor for the face color, and change the Projection to UV. Choose the map just created as the UV Map
Weirdly enough the face now gets projected from the side, which is totaly silly since we used the same settings as the cylindircal projection used to create to image to the (top) left. Silly LightWave!
By editing the UV map we will fix this
- Switch one of the viewports to display UV Texture
- Hit a to center the view.
- Where in projection views you select the viewing type (wireframe, smooth shaded, etc) you can choose the texture image as the backdrop
The viewport now displays how the points of the object get projected onto the 2D plane of the image. You can use all the modify tools to manipulate this relationship in this viewport
- Hit t to get into the Modify > Translate > Move tool. While holding down CRTL to contraint the action to one axis, move the texture coordinates sideways to make the nove line up with the nose in the image
What now stick out, is mapped to other side (because in the Texture Editor the edges are set to wrapping around, thst is: width and height tile are set to repeat) - Select those polygons, move again holding CTRL
- Hey, there are some points left behind! Select them and move them to the proper place
- These point remain red when not selected. This means they are 'broken'. A point can have different UV's for each polygon that it is a part of. 'Broken' UV's have different UV values for the different polygons they are part of, resulting in a sudden jump in the texture mapping. To fix this, select these points and choose Map > Texture > Heal UV's
Please note that edge points are always broken. However, if they map to values that get mapped to the same point in the image, the texture will look continuous
For instance: UV texture coordinates with a value of (.25,1) or (25%, 100%) will map to the the same point in the image as a the UV values (1.25, 1) or (125%, 100%)
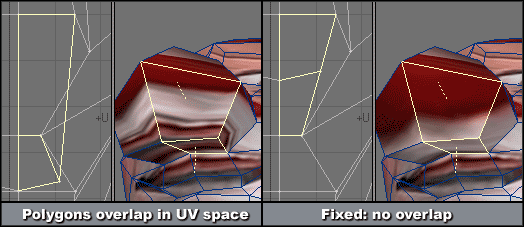 The mapping of the nose is still a mess, because the polygons overlap in UV texture space. We will have to untangle them. In the UV texture view, we can manipulate ponts and polygons in much the same way as in the other views, using Move (t), Drag (CTRL-t), Stretch (h), Size (SHIFT-H) and Rotate (y)
If you turn off Free Move you avoid accidentaly breaking points. Make sure to not move any of the (broken) edge points though!
An important thing to accomplish when adjust the UV map is to avoid overlap. To adjacent polygons should not occupy the same texture space (see image on the left, I turned off the display of the background image in the UV texture view in order to show the polygons more clearly)
The image below shows steps to take to untangle the UV's for the nose and place them. Note that you can select points in either the UV Texture view or the persepective. This comes in handy when two points from the object ended up being very close together in UV space and therefore hard to select in UV texture space.
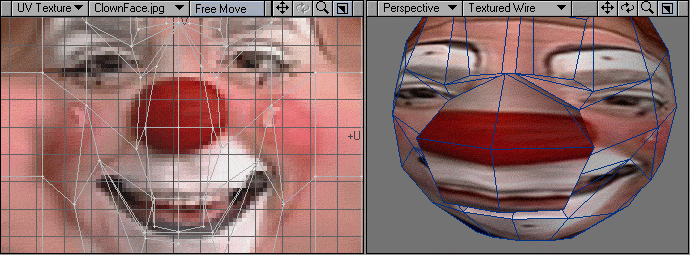
 Now we just need to adjust the placemnt of all the other UV points on the face to get a perfect fit! The image will be stratching accross the surface. This is due to the fact that the features in the image are very differently proportioned than those of the model.
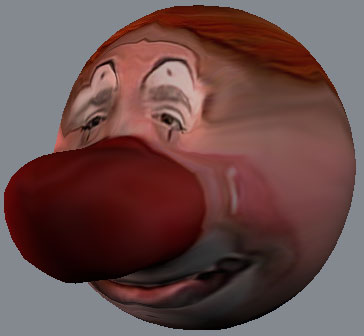
Good Luck! :)